Posted 2012/03 - 3 months after making the screen.
Introduction
The title of this article is something of a misnomer. What you'll find documented here is just a personal experience with "Screen Goo", not a comprehensive guide to screen making. Screen Goo is a product for making or, rather, painting your own high quality TV projection screen at a cost much less than that of a similar quality pre-built screen. You do, however, need a flat, reasonably smooth surface such as a wall on which to paint the material. A willingness to deal with some of the mess that goes with painting helps.
You can find out all about the product and making your own screen here:
http://www.googuru.ca/index.php
... and a YouTube presentation on recommended application procedure here:
http://www.youtube.com/watch?v=I9Or1HvBy8w
The foregoing are links to the Canadian supplier. For other locations, check with
http://www.goosystemsglobal.com/indexb73f.html?cont=home
The Goo comprises two components:
- A base/reflective coating which overcomes any undesireable optical properties of the supporting material. That is, it minimizes light passing through and possibly scattering within the substrate. Image brightness and contrast are thereby improved. The base can be painted on practically anything that will accept conventional latex paints, including latex paint itself. The manufacturer's documentation covers all aspects of surface selection and preparation. In fact, all the documentation is excellent.
- A finish/viewing coating which is what the image is actually projected onto. This goes over the base once the latter has cured for a few hours.
The Goo layers are applied with a conventional paint roller. You can supply your own according to recommendations but it is much more convenient (and guarantees the roller is suitable) if you simply order the full kit from the Goo Guru. You get two roller cylinders (one each for base and finish coat), a high quality handle and a robust plastic tray along with jars of the Goo itself and some masking tape. You will also find special trim and a pot of black Goo for making a nice border around your screen if you don't already have this. There are product variants. An online guide helps you determine just what and how much to order. When you are finished painting your screen the rollers, handle and tray clean up easily in water and can be re-used to paint your house or barn.
So why this article? Well, in my view there is nothing like personal experience to supplement manufacturer claims and instructions. I soon discovered not everything worked exactly as suggested and some improvisation was necessary owing to special circumstances. By all means take seriously the manufacturer recommendations but you may find some of what's documented here helpful.
Preparation
Gird up your loins now, such as they may be, and prepare to "Goo":
- Watch the video and read the instructions. As we shall see, a modified technique may be necessary but you want to be thoroughly familiar with the approved methods as they are the foundation to success.
- Check the paint roller. With the actual nap-covered roller cylinder in place, ensure the assembly spins freely. Do this before you start. Mine had a bad catch in the movement. When you start painting this will cause the cylinder to drag, producing an uneven pattern of application which may be almost impossible to correct. I got mine to work perfectly by spraying a bit of silicone lubricant into the nylon bearings at each end (just don't get any of this on the nap as it will repel the paint).
- Prepare the underlying screen surface. I had an existing home-made screen with a 10 ft diagonal and 4:3 aspect ratio. (There are moveable black felt masks for changing this to 16:9.) The actual surface is the back-side of a sheet of "Aqua Floor" bathroom flooring filled with plastic caulk (to deal with the dimple pattern) and painted with flat latex. This sheet is stretched and clamped to a wooden frame providing a very nice projection surface. This has proved a good screen over the years but is too transparent for optimum contrast and color saturation, hence the Goo project as part of upgrading the over-all system. Using a lamp held to the side of this screen numerous specks and pimples from the latex paint were visible. A few minutes work with fine sandpaper eliminated these, resulting in a perfect substrate for the Goo.
- Organize your materials. Once started, you must work quickly and steadily. Put some newspaper on the floor underneath the screen. My choice was a day old Calgary Herald, placed front page up where there was a photograph of a politician I dislike. Just about any other daily should do, according to your motivations and availability. This protection is recommended because although Goo will not splatter, you might drop the roller. It happens. If there's exposed carpet, cleanup will prove difficult and will interrupt your work, endangering the entire project. Place the paint tray where you won't step in it or knock it over. Have ready a lamp or large flashlight. By casting a beam of light from this at a shallow angle across the surface of the screen from the side, defects in your work such as ridges or lumps become magnified by their own shadows and are easily fixed before they become permanent. That is the most important piece of personal advice I have to give. It practically ensures a perfect outcome.
- Have a roll of paper towelling handy to wipe your hands and anything else that gets besmeared with Goo. It will happen. Something dampened with water works best.
- Wear old clothes. You won't get a speck of Goo on them and wonder afterwards why you bothered but if you wear good clothes they will be ruined within a couple of minutes no matter how careful you are. Don't ask me how this happens. I just know it does. It is The Law Concerning the Contrariness of Inanimate Objects which is itself a subset of Murphy's Law. You cannot overcome this law any more than you can defy The Law of Gravity.
- Avoid distractions. Goo timing is important. You don't want to be called away to argue for 30 minutes with a telephone solicitor determined to book you on a five week cruise to Devil's Island or to answer a doorbell rung by the meter reader. Meter readers are professionally trained in how to maximize the inconvenience of their unwanted visits. It is a near certainty one will show up just as you dip the roller in the Goo and some of it begins running down your arm. In fact, he will wait out in the street until just before you begin, clairvoyantly sensing the most inopportune moment to rush up the walkway and ring. If you then submit to the bullying and let him in, he will immediately find a way to slip on the newspaper and tip the paint tray before proceeding to the furnace room, leaving white footprints on the carpet all the way. Get someone else to keep these pests at bay until you are done. Finally, go to the bathroom. The last thing you will need during a finicky finishing stroke is what medical people slyly refer to these days as "urgency". Goo work takes only a few minutes for each coat but any interruptions at all are asking for trouble.
- Wipe the inside of the tray with a damp paper towel, even if it looks clean. This to pick up any specks, grit etc that might mar the screen surface.
- You probably don't need to mask-off the screen area but if so, now is the time to use the masking tape in the kit.
- Pour some base coat into the tray. If you have a screen as large as mine you will need around twice the 200 ml suggested for the first coat. That still leaves plenty for the second coat. You won't run out with the 1000 ml jar. The base Goo is very gooey - more viscous even than ceiling paint. This is good but poses some later challenges. Owing to thickness of the stuff it pours slowly and as the jar is tipped upright again a good deal of it is liable to ooze down the side onto your hand. Its objective is to reach the floor where, it hopes, you have neglected to spread The Calgary Herald (or whatever). You can obstruct this insidious agenda by rotating the jar as you finish decanting into the tray, in the manner of the cautious wine steward twirling his bottle to prevent a splotch of Old Red Eye on your sleeve after he has poured you a glass. Alternatively, intercept as much as possible of the ambitious blob with the roller. Here is where you will appreciate having that roll of paper towelling. Wipe off the jar. It's very smooth and the Goo makes it slippery now, inviting a drop and spill (its plan "B" for reaching the carpet).
Painting
Base/Reflective Coat
You should have watched the video by now. Begin with the demonstrated technique. I noticed almost immediately that the roller left some small dry patches in its wake. This was unexpected and alarming. The reason might have been that my theater room is below ground level and rather cool most of the time so the Goo may have been extra thick. For whatever reason there were dry patches. I responded by abandoning the official method and running the roller back and forth in desperation, even horizontally at times. I can see the Goo people going (gooing?) into shock at this but as you will find in the conclusion to this article, a perfect result was obtained just the same and I now recommend the method if you have this problem.
The principle to keep in mind is this:
- The Goo is very thick
- It dries very quickly
More important than applying it in vertical strips only, as shown in the video, is to ensure you flatten out all of the Goo just applied before the critical 2 minutes expires. With your flashlight or lamp held to the side look for any ridges or bumps left by the roller and deal with these ASAP. So long as you do this it really doesn't matter in which direction you apply the roller or how often you go over a spot. Really. Anyway, always begin with the approved method first, then modify in response to emerging necessity, keeping alert for ridges, bumps, bare spots and any other evidence of non-uniform application. Try to be done with all touch-ups before 2 minutes is up (for each pair of vertical strips). Work quickly and thin-out the coat as much as possible.
When the first coat is completed it looks absolutely horrible. Calm yourself. Fight the urge to re-apply the roller. It soon improves and after about 30 minutes you may even start congratulating yourself on just how great it is beginning to look. It "dries down" extremely well. In my case, after the 1.5 hour initial drying, some faint vertical bands were still visible where the painted strips overlapped. This is normal and besides, there's a second base coat soon to come.
Tip: While the first layer of base coat is drying, seal the roller in a plastic bag and stretch some Saran wrap over the tray. This will prevent left-over Goo from stiffening and making it more difficult to get started with the second coat.
For the second base coat I offset the roller by 1/2 width to the right at the start (working from left to right across the screen with the vertical strips). The results proved this is highly effective in preventing build-up of the overlap zones and ensuring the base coat is uniformly applied. The half width at first unpainted is dealt with using a couple of finishing strokes after the first vertical strips are done. Once again a modified technique was necessary to cover dry spots and work out ridges (Sorry, Goo Guru). No matter. So long as you work quickly and roller thoroughly the Goo will flatten nicely and there's no problem. The stuff is much more forgiving than you might think. The flashlight trick will instantly expose any trouble spots for you to deal with before it is too late.
This second base coat looked great right away and within 10 minutes the screen was absolutely beautiful, with the finish coats still to come, sort of like the icing on the cake. It proved impossible to resist turning on the projector for a quick look. There was an immediate improvement in the appearance of images with contrast and color noticeably better. How nice! It was possible now to turn down the brightness of the projector quite a bit which further contributed to image quality by reducing flare in the lenses and "bloom" in the phosphors (this is an old CRT projector).
When done, wash out the tray and roller. You can re-use the roller for the finish coat but to play it safe, slip on the un-used cylinder as you know it is thoroughly dry and clean.
Finish/Viewing Coat
- When the base coat is completely dry (about 24 hours), examine from the side with lamp or flashlight and work off any ridges, lumps etc. with fine sandpaper. Don't get anal retentive over this. Forensics are unwarranted. You are very unlikely to find much wrong to begin with and during actual movie viewing any minor flaws that escaped your inspection will be invisible anyway.
- Proceed now exactly as above for the base coat after observing the recommended drying time. The finish coat looks good almost right away.
The finish Goo is much less viscous than the base Goo. This makes it easier to apply. Again, use the lamp or flashlight off to the side to expose ridges left where Goo is squeezed out the ends of the roller and tidy these up with light roller strokes.
While the base Goo is practically odorless, the finish has an unpleasant gassy aroma - by no means a lethal stench but you will notice it. This didn't bother me in the least but someone highly sensitive to such things might want to arrange for ventilation. In any event, each coat takes only a few minutes to apply and afterwards you can go somewhere else while the Goo dries. Take a long walk or go shopping for DVDs. The smell is gone in about an hour, less if you leave someone at home to inhale the remains of the fumes. Seriously, it's not that bad. My wife is hyper-sensitive to chemical odors. While applying the final coat I asked her if the smell was bothering her and she replied "What smell?"
What to Expect
The finished Goo screen looks great while still damp but it will improve markedly for a day or so and much more slowly - but significantly - after that. The observations that follow derive from comparison with my previous latex screen which had a rather too transparent backing.
- Brightness or gain significantly improved. It was necessary to turn down projector brightness. This is good because projectors perform better at lower settings.
- Color saturation improved because of less light scattering within the screen surface and substrate. Accordingly, color saturation also turned down which again extracts better performance from the projector. "Blooming" in saturated reds eliminated (for example).
- Sharpness improved. This made possible backing off the projector sharpness control without losing detail. On my unit high sharpness settings produce halos around high contrast boundaries. These are now rarely visible and then only faintly.
- Black level much improved. A somewhat surprising benefit. I have a hi-def 30 inch Sony LCD TV beside the large screen. In direct comparison the Goo screen produces distinctly blacker blacks, with detail. Color saturation and contrast from the projector now very competitive with the LCD which was certainly not the case before Goo'ing.
- Whites improved but ... in direct comparison the LCD TV still delivers brighter whites as it did before although the difference is now much reduced. I am attributing the LCD advantage to the possibility the CRT unit is sub par. It is, after all, 12 years old. Whites still look fine but there's no denying the LCD has the edge here, while losing out significantly in the blacks. The projector has not been calibrated in 10 years so that's something else to consider.
- Long term ... as indicated in the documentation, performance of the screen improves very noticeably for at least a couple of months. You will find yourself turning down brightness and saturation even more, to the benefit of the projected image.
General Comments - Large Screens
People not having an interest in the "theater experience" may try to pooh-pooh yours by pointing out that if you want to see a large image, just sit closer to a conventional size screen or TV. In theory this makes perfect sense. No matter what size the screen, you probably want to sit at a distance where you don't have to move your head and your eyes more than slightly to follow the action. That distance is one where the image fills, very roughly, 50% of your lateral field of vision. Anything closer invites a splitting headache. In other words, the field of view you will find most comfortable and enjoyable is independent of the screen size. Bear in mind also that even a high definition image has only 2000 pixels. View this at too large an apparent size and it becomes unavoidably fuzzy. So far, those who fleer at your large screen aspirations are on the right track.
So why bother with a large screen at all?
- Eye comfort - Sitting closer to a small screen means your eyes must hold focus for the shorter distance. Unless you are still in your teenage years this will probably prove uncomfortable (if possible at all), leading to eyestrain. Viewing is always most comfortable at a distance where the eye is essentially at infinity while wearing your glasses/contacts (if necessary). That distance begins around 15 to 20 feet, where even a 30 inch screen looks too small. There are a number of rules of thumb out there for optimum viewing distance with "two to three times the screen height" being common. That works out just about right for viewing a 10 ft diagonal screen from 15 to 20 ft., which is very eye friendly, but for a 30 inch TV it means less than three ft. (for similar field of view) which many adults would find intolerable.
- Visual noise - At close distances you might see imperfections in the viewing surface itself. Dust, fingerprints and fine surface textures all become visible. A large screen has to be in pretty rough shape for you to see any surface imperfections at all at a distance of 15 ft. Conventional monitors (LCDs, plasmas) are also prone to picking up room reflections whereas the matte surface typical of most large screens is immune.
- Sense of space - At optimum distance, a large screen places you well back in the room where you become more aware of the surrounding space - like being in a real theater except without the chewing gum under the seat, the floor sticky with Coke spilled in 1985 and the ox behind you discussing in a loud voice with his date every line in the movie dialog - when he isn't horking down your neck or shoving his knees into your back. There are advantages to home theater.
- Sound - Audio usually sounds better if you are just outside the "near field" as audiophiles call it. If you are too close to the speakers (which are usually in the same plane as the screen) you are liable to pick up aural cues as to their exact location, which may compromise appreciation of the intended audio experience. Note that some people prefer near field audio and will use headphones to obtain it at any distance. To each his own and you might want to experiment.
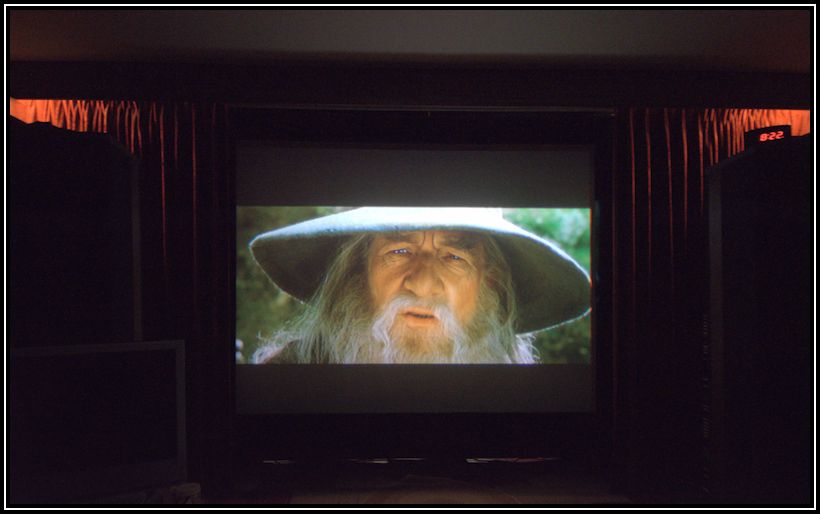
Screen Shot
Here's a snapshot of my Goo screen in action with an actual frame from a DVD. Taking a photo in an almost totally dark room at ISO 6400 is no way to win a prize but still, the un-retouched image suggests something of the detail and natural color Goo makes possible. Furthermore, the relatively high gain of the surface means the projector is running with brightness and contrast turned way down. That improves image appearance and may even lengthen the life span of your unit (CRT's especially).
The screen's diagonal is just over 10 ft. Its physical aspect ratio is 4:3 so the 16:9 projected here does not fill it vertically. The black felt covered borders can be slid closer together to provide perfect framing if desired. Although the Sony VPH-60Q is definitely a vintage projector it still delivers an excellent picture with a good screen. I have decided for now against spending $5k+ to upgrade. Goo can save you a lot of money and not just in construction of a screen.
My talented wife made the red velvet theater curtains many years ago. The lighting is 15 Watts each side and tied into remote power for the projector. We find having some lighting provides a more comfortable viewing experience than a totally dark room. Speakers are Polk Signature Reference Series and like just about everything else in the system, of antique status. Paying for quality is ultimately the cheapest way to go, however. Components such as our Harmon Kardon "Citation" power amp from 30 years ago still sound as good or better than anything new we audition in the stores and it has proved indestructible.
Conclusion
Goo is great. You can believe everything the supplier says about it. It provides a way to have a large, high quality screen at a modest price.
I recommend it without hesitation to anyone who doesn't mind messing with paint or, if they do mind, are prepared to make an exception. Cleanup is easy because the stuff is water based. Successful application requires some discipline in reviewing the instructions and in preparation but so what. The entire process is quick and easy.
True, you can make a nice screen using just flat latex paint but when you see the difference Goo makes you will know it was worth it especially if, as in my case, the underlying surface is not optimal to begin with. It seems like false economy to spend a lot of money on a fine A/V system and then balk at spending a couple of hundred dollars or so for a top-notch viewing surface. According to many reviews Goo provides a performance comparable to the most highly rated pre-built screens. I'm not in a position to confirm that conclusion by direct comparison but do find that in absolute terms this product produces a superb viewing experience more likely to be limited by the capabilities of your projector than those of the screen. Goo delivers the goods and is an excellent value besides.
Contact
If you would like to post a comment to the author of this article or ask a question, click Here.