Document Created By JHzlwd- January / 2014
Most recent update: 2014/Jan 13
Introduction
Black Shark is a superb simulator providing a realistic helicopter flight model and combat experience. It is also a very complex product and, despite good documentation, there are some pitfalls to confound the newcomer.
This article is a selection of personal experiences, remedies and observations you might find useful when installing, running and flying Black Shark, especially if you are inexperienced with the simulation. The target audience is visitors still a bit unfamiliar with the product and helicopter flight dynamics. Consider also reviewing the Beginner's page which can be chosen from the menu to the left. It complements the informaton provided here.
Links
The following gets you to the main page for Eagle Dynamics (Black Shark developers). You'll find product downloads there and, of course, the starting point for everything else:
http://www.digitalcombatsimulator.com/
Here's a direct link to the forums:
Assumptions
- You are running up-to-date Windows 7/8/8.1 - 64 bit and your display drivers are current. Yes, DCS World and the individual aircraft modules work perfectly in Win 8/8.1. Furthermore, the Logitech and Saitek products mentioned here do as well but you'll have to download the Win 8 drivers and other software.
- You have Administrator privileges.
- Your keyboard (KB) is a Logitech G110 or G510 (preferred). If you use something else, just ignore the keyboard information or adapt to you own situation.
- Your flight control system (FCS) is the Saitek X52 Pro. If you use something else, ignore FCS information or adapt.
- You have facilities adequate to run the simulation without running out of memory or experiencing poor frame rates, control lag, etc. The simulation is very demanding.
- You have good basic skills in PC use ... for example you are comfortable with Control Panel and know how to manage system security/access settings.
This is very straighforward. Install DCS World, then any aircraft modules you have purchased. DCS World provides the common components for all aircraft and scenarios, greatly reducing the size of individual aircraft downloads. It's an interesting and clever architecture.
I strongly recommend you set up a custom folder for DCS World rather than installing into default \Program Files.
For example, under C: you could create a directory ...
\$DCS-EAGLE-DYNAMICS as the high level directory. I install DCS World directly into that which results in a \DCS World sub-directory appearing. Under \$DCS-EAGLE-Dynamics I allocate:
\$$MISSIONS for the missions I write.
\$KB-LAYOUTS where I put a semi-graphical file describing what my programmed keyboard keys do. This is not used by any of the simulation software but just for my reference.
\$PROFILES where I save (in sub-folders for each aircraft module as indicated below) all my profiles generated by the simulation OPTIONS itself and by the Logitech keyboard profiler. Note the Logitech profiler stores its working version of profiles somewhere else but I EXPORT a copy to this folder so that when I backup DCS, a good copy of the Logitech profiles is automatically included. Profiles can be downloaded from the Missions and Profiles page.
Under each of those folders I have an additional level of folders for files used by each aircraft module ... \01-Black-Shark, \02-Warthog etc.
$$MISSIONS and $PROFILES are "active" in the sense I use them instead of the DCS defaults for the same contents. The reason? They are easier to find than where the simulation would like to put them. After the first time you reference these locations while setting up the simulation it will remember where they are and there is no further inconvenience. This scheme provides a much cleaner organization and you see the directory immediately upon opening the root in Explorer. Makes it much more convenient to edit, backup and examine files having them all in one place rather than having to rummage around in the DCS folders.
Once DCS World is installed simply let each aircraft module take the default installation path and it will go where it is supposed to.
Here's a screen shot of my directory structure. This has proved very enjoyable to work with while reducing the frequency of mistakes when saving and loading items:
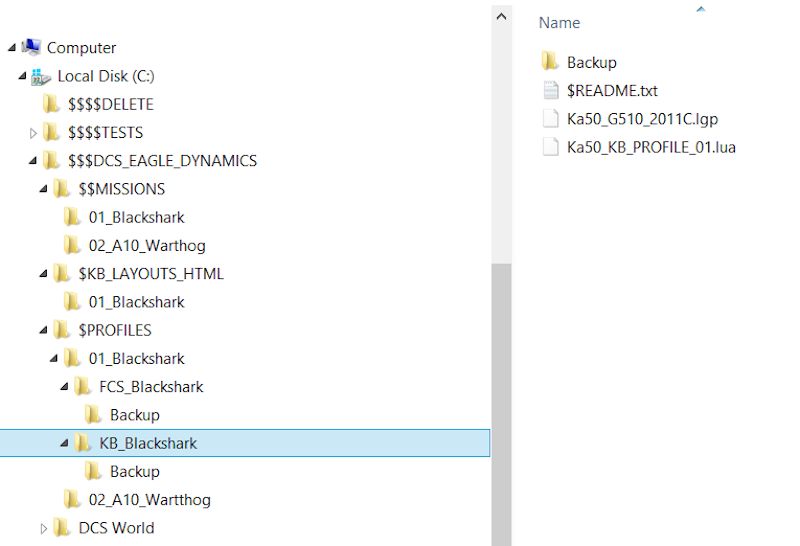
This is a rather old screen capture. These days the exported Logitech profile would be a .xml file.
Upgrades vs Clean Installs
As with practically every other software product there is from time to time a lower cost upgrade route offered to current owners of DCS World and the individual aircraft modules. I am going to be a bit controversial now. Upgrades almost always cause some frustration. The DCS forum is full of postings regarding annoyances and confusion with the process. You have to have the precedents installed and licensed first and possibly fool with other requirements. As far as I can determine there are no bugs in the upgrade process but for various reasons there are irritations associated with activation key management, file locations, etc. This is unavoidable. The full versions are so inexpensive I simply do not want to be bothered saving a few bucks with the upgrades. Keep your blood pressure down and just buy a full new version when it comes out. This advice does not apply to ordinary patches providing minor upgrades in place.
Note: The latest version of DCS World incoporates an improved update process which appears to address some of my annoyances with installing free upgrades. It automatically upgrades not only DCS World but your installed aircraft modules as well. You still should consider manually downloading all such upgrades so as to have them in your local archive.
Before your first flight you will want to set up your preferred configuration for keyboard (KB) and Flight Control System (FCS). Choose OPTIONS from the simulation start-up screen.
OPTIONS/SYSTEM
- FULL SCREEN will yield better performance than windowed mode but is not as convenient. It's easy to experiment.
- Frame rate on my system is most affected by RESOLUTION, CLUTTER/BUSHES and TREES VISIBILITY. My monitor is 2550 x 1460 but frame rate is much better at 1920 x 1200 and I really can't see any difference at all in detail. You'll have to experiment.
OPTIONS/CONTROLS:
- In the upper left corner is a drop-down box. Choose "KA50 Sim". This box is easily over-looked. The default will NOT use your customized FCS profile but a default. This can prove very puzzling. It is not sufficient to have realistic options set in GAMEPLAY.
- To the right of that box is another drop-down. This provides choices for filtering the displayed KB and FCS assignments. Especially important is AXIS Commands which isolates the pitch, roll, yaw, rudder and throttle/collective FCS controls so you can easily find and customize them.
A shortcoming in the sim documentation is cursory treatment of the CONTROLS profiling facility. It's very powerful and easy to use but easy to misunderstand. Consider the following:
- There is a separate profile for each of KB, FCS and Mouse. (I don't do anything special with the mouse so do not use a profile for that. It won't be discussed further.) In fact, the KB has two profiles - one for the macro keys (described in the "Logitech" section below) and another for the standard keys. Each of these profiles must be saved under its own, unique name. It is all too easy when saving to use the wrong profile name and clobber (for example) the FCS profile with a KB profile. It is also very easy when first using CONTROLS to assume when you SAVE that a composite profile containing settings for both KB and FCS is being saved but this is not the case. You must save each individually.
- When editing or building a profile the first step is to bring into focus the set of controls you want to work with. Click anywhere in the KB (to choose keyboard profile) or FCS (to choose FCS profile) column and notice it is now highlighted at the top.
- If you are going to edit an existing profile, LOAD it now. The profiler does NOT protect you against inadvertently loading an FCS profile into the KB column and vice versa, nor does it protect you against SAVEing a KB profile as an FCS profile (and vice versa). Although you can tell which is which easily enough (stick settings showing up in the KB section make no sense, for example), it's also not that difficult to overlook, make some changes and then SAVE, in which case you have broken a profile. I recommend you adopt a good naming convention to clearly identify profiles. Perhaps a "KB" prefix for KB profiles and "FCS" for the FCS (my choices). For the FCS you could use the Saitek profiler which is excellent but the Black Shark profiler is equally competent and, because it is customized for a helicopter, more intuitive in use. Unless you have a compelling reason to do otherwise, build your FCS profile CONTROLS in the simulator. Even Saitek recommends this and it's what I do.
- For new profiles, highlight the control you are building a profile for (KB or FCS) and, when done, SAVE using your naming convention. I keep all my profiles in the special folders as described earlier in this document.
To Summarize:
There are three profiles to build and maintain ...
- Keyboard macro keys - Build/maintain with Logitech profiler (you have no choice). I use these for weapons and general flight setup
- Keyboard standard key assignments - Build/maintain with DCS profiler found in Options. These are mostly the DCS defaults except for auto-pilot controls.
- Flight Control System switches, buttons and axis controls - Build/maintain with DCS profiler.
Logitech Keyboard
- For the Logitech "G" series gaming KBs you will want to compose macros for the programmable function keys. These keys aren't accessible from the simulator CONTROLS facility. The Logitech profiler is a marvel of inutitive design and won't be extensively described here.
- One of many nice things about these profiles is that they are compatible between the G110 and G510. As the 510 has more programmable keys, the mapping will be different but it's almost trivially easy to fix this. Load the profile into the Logitech editor, then edit by dragging/dropping etc.
- Logitech profiles are auto-stored somewhere in the Logitech folder, in a weird format. If you want to make backups and/or share profiles among machines, use EXPORT/IMPORT instead of trying to find profiles in their native format. An EXPORTed profile appears as an ordinary XML file in a folder of your choice. From there it can be IMPORTed to another (or the same) instance of the Logitech software.
- A profile can be associated with an executable so that it is automatically loaded when the simulation is launched. Logitech warns this is not 100% reliable and - it isn't. There is an option in the utility for having a profile load independently as a default (which always works) or, if you are using the G510, you can load a profile manually using the menu on the LCD. That's the way I do it rather than relying on the somewhat flaky automated process.
Apart from the left side macro keys you may want to re-program some conventional keys for common actions. You do this using the simulation's profiler under CONTROLS as described earlier. This profile is saved from within the CONTROLS panel. Beware the risk of saving it as an FCS profile.
Saitek X52 Pro vs. Thrustmaster "Warthog" Flight Control Systems
These observations might stir controversy but bear in mind much has to do with personal flying style, manual dexterity and psychological factors. To each his own. I have extensive experience with both systems. They are each fine products - easy to install and configure, highly reliable, durable and functional.
- Helicopter piloting requires frequent small precision adjustments of the cyclic and collective. The Thrustmaster has an exceptionally smooth but also very stiff joystick and I simply cannot obtain the degree of delicate control I demand when flying the Ka50. The throttle side where the collective is assigned is fine. The Thrustmaster does not provide a twist axis for rudder so you must use pedals or configure another control to do the job (this is described in my Layout page found elsewhere). Some much prefer pedals. For sure, they are more authentic. I have them but find the hand far superior to the foot when it comes to accurate control. That's just me, perhaps, but it is what it is :~
- The Saitek provides a very light, exquisitely precise joystick action that is perfect for a helicopter. It's an easy choice.
- When flying A10 "Warthog" the Thrustmaster is better. This is, after all, what it is really designed for. The much heavier stick action suits a fixed-wing which has a very less demanding requirement for frequent, finicky control input. The heavy joystick feels entirely natural in this environment in part because it helps avoid inadvertent small inputs. Pedals work well and the absence of a twist axis isn't missed. Rudder action is much less important in a fixed wing to begin with.
Because this is a helicopter resource site I won't spend any more time on the Thrustmaster FCS, in consideration of my preference. This is not to disparage the unit at all. You should evaluate other advice before making a purchase decision or - get both - especially if you intend flying both helicopters and fixed-wings.
I use the simulation profiler under CONTROLS for the X52 Flight Control System (FCS). It's even what Saitek recommends. The simulation profiler is excellent in every way. Set your controls up the way you want them. You will want the collective on the left side controller, however, with the axis reversed for most realistic action. Later I provide a link where you can download my personally built profile for this FCS.
My preference for axis commands is to build curves with a very flat, almost horizontal central region, becoming more extreme at the far ends - like a reversed, flattened "S". This provides refined control for pitch/yaw/bank near the center positions which is the sort of response I like best.
OPTIONS/GAMEPLAY
- Choose cockpit language ENGLISH (or whatever).
- For the ultimate experience you should learn to play in authentic mode. Click SIMULATION to load authentic defaults which you can then customize.
- Uncheck MIRRORS.
- Now you can cheat a bit ... Choose RADIO ASSISTS, LABELS, and TOOLTIPS.
I don't see how any of these, apart from LABELS, compromise realism a whole lot. Unless you play 12 hours/day its hard to remember what every one of the dozens of cockpit controls does so why not use TOOLTIPS? LABELS are a clear cheat but without them you may find locating small targets or even vehicles next to impossible. Until you get the hang of it, LABELS can accelerate learning (you won't be shot down early in a mission so often).
OPTIONS/AUDIO
Choose options to suit your taste. I cheat a bit by turning on sub-titles. Music can get annoying so turn that down. When building my own missions I provide my own musical themes when appropriate.
OPTIONS/MISC
Again - personal taste for the most part. I enjoy External Views. External views are unrealistic but a lot of the fun is derived from taking an outside look once in awhile. Why not enjoy the scenery? Be sure GUI THEME is appropriate to your aircraft.
OPTIONS/SPECIAL
The trimmer has two modes of operation discussed at length in the DCS forums. I uncheck CENTRAL POSITION TRIMMER MODE because I find the alternative much easier to use. To each his own. Experiment.
Here's a recap, to this point, of some things that can go wrong and what to do about it. The first two items do not apply to 1.2.3 version.
- After install the sim hangs and/or there is a screen full of gibberish. ... Review the installation procedure. Be sure to run as Administrator. Installing to custom folders as described earlier in this document may provide a more stable environment than using default \Program Files because this avoids some access privilege problems.
- UNPAUSE does not work. The sim launches but you are grounded on the helo-pad. ... You have almost certainly loaded a bad KB profile where the PAUSE key (and probably others) has been cleared. You may have inadvertently clobbered your KB profile by SAVE-ing a FCS profile to the location. Fix the profile and try again.
- Everything seems to work except that your chosen FCS profile, even though you may have explicitly LOADed it in CONTROLS, is not being used. ... You do not have "KA50 Sim" selected in CONTROLS.
- A KB or FCS profile as displayed in OPTIONS/CONTROLS has the wrong things such as AXIS controls (rudder, stick) appearing in the KB section. ... You have inadvertently LOADed an FCS profile into the KB section (or vice versa). Don't SAVE but if you already did, restore broken profiles from backup (let's hope you have some). I cannot emphasize too much the importance of keeping known good backups for your profiles, especially given the ease with which KB and FCS profiles can be incorrectly loaded or saved. You can always re-build profiles but it is very aggravating having to do so.
Go into OPTIONS every time after launching the sim just to verify you have the right flight mode and that the desired simulation profiles are loaded. Ditto for the Logitech profiler. Things are easily changed/overlooked and sometimes stuff changes for no reason at all.
DCS has a remarkably good mission builder. It's easy to learn and largely intuitive in use. The best way to get started is to load up an existing mission, perhaps one supplied with the sim, and tinker with it (be sure to backup the originals). It won't be long before you have made it your own.
There are a few pitfalls worth keeping in mind. Some are actual bugs and others are just operational details easy to overlook. Note that ED is always fixing things so by the time you read this, some of the glitches may have been addressed:
- Your mission launches but instead of finding yourself in the cockpit, you are stuck with an external view. ... You have not allocated a helicopter for PLAYER (that's you). Doh! There's a glitch you must deal with: you cannot assign PLAYER to a helicopter until AFTER you have placed the helicopter on the map and done a mission SAVE. After that, choose the helicopter again and the PLAYER option will become available for assignment, then SAVE again.
- Your helicopter has a really weird color scheme you wouldn't want to be seen in. The color scheme/pattern are selected in the Mission Builder loadout option where you choose weapons.
- You cannot get EDIT to work for an existing unit. This rarely happens and I'm not sure why when it does. For example, it might prove impossible to edit a unit count. Open the unit display table chosen from near the bottom of the left-side menu, then highlight the un-cooperative unit. Editing should now work.
- Units (GROUPS) can be specified in a way that causes them to appear (ACTIVATE GROUP) in response to a trigger, such as your flying into a certain trigger zone. For this to work, the Group LATE ACTIVATION box must be checked. It's easy to overlook.
- Some self-propelled vehicles can't actually move. At least one of the motorized anti-aircraft units (I don't remember exactly which it is) is this way. If you include such a unit in a convoy, the entire convoy mysteriously refuses to move although according to specs they are all capable. This can be very frustrating. Inspect un-cooperative convoys for the culprit(s) and remove or replace with something equivalent that really does know how to move. For unkown reasons a convoy still may not move. Try deleting first waypoint and replacing it or replacing the entire convoy.
- If you want a trigger zone to move along with an assigned unit this is done from within the CONDITIONS panel for configuring the trigger. It would be more intuitive (IMO) to have this done when the trigger is first placed on the map.
- Player assigned mobile units often have difficulty crossing bridges, especially if they are in convoys. They fall off the sides, get stuck cross-wise or try to ford the waterway as if they were amphibious. This can be hilarious but ends up being a big nuisance at times. The only workaround for now is to design the mission so units having this problem don't have to cross bridges.
Apart from that there's not much to say about Mission Builder pitfalls. It's pretty clean. There are a number of oddities but generally you can work around them.
There are lots of resources in the manual and on the Web concerning helicopter flight and control. The best advice is practice, practice, practice. After a considerable time it all becomes second nature and you will find it easy to perform complex maneuvers even while engaging the enemy.
- Be patient and persistent. Flying a helicopter is difficult compared to fixed-wing. You will have to fight discouragement. Many noobies think there is something wrong with the flight model because of all the out-of-control situations they get into, the crashes, wild spins, rotor blades snapping off and brutal landings with hardpoints broken off, tires blown and sometimes even a fatal explosion. It's frustrating but there is nothing wrong. After a lot of flying you will improve. Just keep at it - eventually the control inputs become second nature - you fly smoothly in all circumstances, pull into a nice hover without changing altitude (or needing auto-hover), engage targets without loss of control and, when it's all over, land gently as a leaf back home. It can be done and there is a great sense of satisfaction in becoming really good at this. A useful trick recommended by psychologists: If you find yourself on a learning plateau while developing any skill - not getting any better - give it a rest for a few days or even weeks. When you return there is a high probability you will find yourself miraculously improved in the meantime. It worked for me. The theory is that the brain keeps reviewing the challenge, off-line as it were, and refines the skill without needing additional input from you.
- Use the auto-pilot options. Bank, Heading, Roll and Pitch should always be engaged.
- Trim often. There is some controversy surrounding how best to trim. Hold the cyclic steady with the helicopter in desired attitude, click TRIM quickly and it will normalize the control for that orientation of the aircraft. In some situations I find it works better to hold TRIM down continuously while adjusting the helicopter's attitude, then release TRIM and let the cyclic re-center. The latter works much better when it is the first trim after take-off. Holding TRIM down continuously during a turn can improve responsiveness of the helicopter by temporarily disengaging the auto-pilot. You'll have to experiment a lot to get the hang of it.
- Anticipate. For example, gradually begin turning before you get to the point where you really want to turn. Similarly, begin gently easing out of a maneuver such as a turn before you want it completed. Do everything gradually, starting out very slowly then progressing to a more aggressive control input and, finally, finishing with a gradually slowing action.
- Wait. This is related to "anticipate". Give the aircraft time to respond to control inputs before thinking you must panic and supply a severe correction. Over-reaction will prove your worst enemy. The unit has a lot of intertia and this is accurately modelled.
- Counter-intuitively, perhaps, is that learning sensitive, appropriate adjustment of the collective is more important than fully mastering the more complex cyclic. Think of the collective as supplying power along the axis of the rotor (which it does). This is where the power comes from for all maneuvers. There is no direct equivalent in a fixed-wing. Pay a lot of attention to rate of ascent during any maneuver, trying to maintain fine control of altitude primarily with use of the collective. You will be adjusting the collective frequently. It's an art.
- The single most important instrument is rate of ascent/descent. Make it a habit to check this often. It's projected on the HUD in navigation mode but the round gauge is more precise, easier to read and never disappears (the HUD version displays only in navigation mode)..
- Learn to hover without using auto-hover. In fact, at some level of skill acquisition it is easier to hover manually than using auto which you can sometimes end up fighting with. If you can reliably establish manual hover you will be demonstrating mastery of fine control input useful in all other maneuvers.
- Low and fast. Practice flying low and fast over varied terrain, using primarily the collective to pop up over hills and drop into low spots.
- Don't be a one trick pony. We all develop favorite ways of doing things. For example, you might find you always prefer landing by means of a counter-clockwise turning approach. Discipline yourself to do straight-in approaches and clockwise turning approaches as well. This will round out your skills. Employ similar discipline for other maneuvers. In combat you never know what you will need. Practice flying low in urban environments where you must avoid structures. Plan a route and stick to it rather than taking the easy way at altitude. Practice flying under bridges and power lines rather than over them. Fly into a hangar, rotate, then fly out again without striking the floor or sides. Land on bridges, buildings and oil platforms.
- Landing can be a nerve-wracking challenge at first. Maintain some forward speed and a slightly nose-up attitude just before contact. This avoids the dreaded vortex effect. You can descend 100% vertically but must do so slowly owing to the vortex. Practice with a simple mission where all you do is repeated "touch and go" on the runway. Prior to landing burn off altitude at higher speeds (while still maintaining forward motion) by reducing the collective and pulling back on the cyclic then, as you approach a near-hover increase the collective to descend very slowly while maintaining position with the cyclic and rudder. You can burn altitude off very quickly by diving. This increases speed so be careful not to overdo it and break something. Be especially cautious when pulling out ... there will be enormous load on the rotor.
- Don't be a lazy lander. On runways and other large open areas it is tempting to land any old place where you feel the helicopter is stable and going slow enough. Why not grab a safe opportunity? But ... you will build important skills more quickly by choosing a specific landing spot (such as a particular FARP pad) and making a determined effort to land there and only there. When landing on a ship's platform, aim for the "H" and touch down exactly there. Work at touching down without bouncing or rolling backwards.
- If you do end up getting caught in the vortex let's hope you are at sufficient altitude that this works: You will notice onset of much vibration combined with an alarming rate of descent. Decrease the collective and push the nose down with the cyclic until you recover control in clean air. That's about all you can do. You get caught in the vortex by descending too quicky at very low (or zero) forward speed. You can sometimes get caught during a tight, banked combat turn as well where your speed quickly reduces to zero during rapid altitude loss. You can prevent this by ensuring adequate collective input while completing a tight turn. A rate of descent > 4m/s is the usual vortex trigger point at low speed. Once in the vortex increasing collective only makes things worse.
- If you do use auto-hover, remember to switch off the auto-pilot ALTITUDE HOLD when resuming normal flight or you will encounter mysterious stability problems.
- Similarly, when dis-engaging from a target where you have used the SKVAL (Vikhr, for example), turn off AUTO-TURN which otherwise causes the helicopter to automatically face where you last pegged the designator. If you have not reset the targeting system or turned off AUTO-TURN, the helicopter will fight your control settings as you fly away, trying to face back in direction of the most recently designated target.
Comparison with Fixed-wing Aircraft
New pilots often find that negotiating a hard turn at higher speed with a helicopter will result in undesired altitude change, instability or even a rotor blade snapping off. Most of us started out flying in fixed-wings which are handled differently and it is necessary to overcome fixed-wing habits.
Fixed-wings ...
- Tolerate very high "G" forces.
- Exceptional roll axis agility.
- Very good pitch axis agility.
- Poor rudder response (weak yaw axis agility)
- Thrust is along the roll axis.
- Lose lift as speed drops, risking stall or spin.
Helicopters ...
- Intolerant of high "G" force
- Limited roll axis agility (although the Ka-50 is pretty good and complete rolls are possible if not very useful).
- Limited pitch axis agility. Try doing a loop and see what happens.
- Superb rudder response and yaw axis agility.
- Power is provided along the rotor axis. It is divided between providing lift and lateral thrust by means of the cyclic. Important point: as you pull back on the cyclic power going into forward thrust is reduced and redistributed to enhance lift.
- Full lift is available at zero speed. Can't stall but there is risk of vortex trap.
Turns
Fixed-wings ...
- Roll in direction of the turn. A roll of more than 90 degrees is common in combat maneuvers.
- Haul back on the stick.
- In higher performance aircraft the rudder will prove of limited usefulness.
Helicopters ...
- Roll in direction of the turn. The Ka-50 can tolerate considerable roll.
- Apply rudder.
- You can pull back on the cyclic to sharpen the turn but beware of overloading the rotor and of unwanted altitude gain.
- To achieve a very sharp turn using both rudder and cyclic I usually find myself greatly reducing collective through the first half of the turn to prevent unwanted altitude gain, then increasing collective to pull out of the turn and avoid a drop in altitude (plus avoid vortex in case speed drops to zero). By this means you can practically turn on a dime even when entering the turn at high speed (speed will reduce dramatically).
- As you level out it may be necessary to adjust the collective again to compensate for the rotor axis going vertical.
There are plenty of variations, of course, depending on your objectives but the thing to note is high effectiveness of rudder input in accomplishing a turn and need to modulate collective constantly throughout the turn. In a hover or at very low speed the rudder will be the only way to turn.
Note that unlike a fixed-wing where we don't often apply a lot of throttle input, the collective on a helicopter gets used a lot to make fine adjustments in altitude, rate of turn and rotor loading.
Action Setup: KB, FCS and Cockpit Controls
I have set up my KB and FCS to be a compromise between authenticity and minimum requirement to remove hands from the FCS. KB and FCS profiles are heavily subject to personal taste so don't take mine as gospel. They might prove useful as suggestions, however. They have served me extremely well.
As a general observation, you do not need to master the majority of cockpit instrumentation and controls in order to fly challenging, simulation mode missions although over time you will obtain more enjoyment by acquiring a comprehensive understanding of this complex machine and environment.
Remember the Logitech Profiler profile for macro keys must be IMPORTed from wherever you decide to store the EXPORTed versions (which the downloads are). Once a profile has been imported, the Logitech profile editor will display titles for the programmable keys which describe the action taken or you can always look up the key sequences in the macro editor. The Black Shark profile for standard keys must be LOADed using the Black Shark OPTIONS/CONTROLS facility.
LOAD the profile for the Saitek FCS using Black Shark OPTIONS/CONTROLS and then click through the controls (on the FCS) to find their descriptions on the left side of the panel. The controls are also described later on this page.
Logitech Programmable Keys Profile
Download from this link, then IMPORT using the Logitech profile editor..
(Reminder: There are two profiles for the keyboard ... this one prepared using the Logitech Profiler for the programmable keys and the one prepared using the Black Shark OPTIONS/CONTROLS Profiler, which is for the standard keys.)
These are set up in two memory banks: M1/M2 chosen from above the programmed keys. (Example: M1/G1 indicates M1 bank selected, G1 clicked).
M2 Bank -
G1 - Immediately after taking off this macro retracts gear and performs many other functions necessary for successful non-combat flight, such as turning on the ABRIS, turning on cockpit lights, adjusting turbine output and so forth.
There are no other programmed key functions in M2.
M1 Bank -
- M1+G1: Engages basic combat options such as arming the weapons system, choosing outboard hard-points, turning on LASER, turning on MOVING TARGET mode and more. Other programmed keys are set up for ...
- Counter measures deployment
- Weapon select (hard points).
- Helmet mounted sight deployment.
- Auto-Turn, Moving Target, LASER toggle and RESET
Other macro keys are programmed as follows:
G5 - Begin dispensing decoys
G4 - Cease dispensing decoys
G7 - Select outboard weapons hardpoint
G8 - Select inboard weapons hardpoint
G10 - Toggle: Helmet mounted targeter on/off
G13 - Toggle: AUTO-TURN on/off
G12 - Cancel weapons RESET (G17) but helmet mounted targeter is not restored. You can do that with G10. Does not choose a hard point. Use G7/8.
G14 - Toggle: Moving Ground Target. I always have this on.
G16 - Toggle: LASER on/off
G17 - Weapons system reset. Good for on the way home when you want your normal HUD display. Also useful if you have been using guided munitions and want to use rockets. This does not turn off arming. Cannon remains available but you will have to manually choose inboard/outboard hardpoints, auto-turn, moving ground target and (if required) the helmet targeter. LASER remains active. You can revoke G17 with G12 ... consider that a short-cut for most of the foregoing manual operations.
That's all you really need on the programmed keys for most missions. I will eventually program more macros but this configuration has served well.
The M1 bank can remain engaged throughout the mission, including during RTB.
Black Shark OPTIONS/CONTROLS Profile for Keyboard
Download from this link, then LOAD to "Keyboard" using OPTIONS/CONTROLS
All Black Shark defaults used except for numeric keypad where:
1, 2, 4, 5 are programmed to duplicate auto-pilot Heading Hold, Altitude Hold, Bank Hold, Pitch Hold respectively. This is same as the cockpit layout and all are toggles. The only one you might normally need is Altitude Hold. This gets turned ON by Auto Hover and has to be manually toggled OFF upon cancelling Auto-Hover.
The keyboard profiles provide "boiler-plate" settings which are easily changed later using cockpit controls. Note that some settings are engaged whether or not needed for the specific target. I have not discovered any down-side to always having the LASER on and/or MOVING TARGET (which works just as well on stationary targets).
Black Shark OPTIONS/CONTROLS Profile for Saitek FCS
Download from Missions and Profiles page, then LOAD to "Saitek" using OPTIONS/CONTROLS. (This assumes the Saitek X52 Pro has been successfully installed earlier.) Buttons identified with letter "T" (9 through 14) are the spring-loaded toggles along the bottom of the joystick unit.
Right side control unit -
Highlighted button notation is taken from the simulation profiles in OPTIONS/CONTROLS. The letter designations inside quotes are Saitek's terms.
- JOY BTN5 Trim ("C" button)
- JOY BTN3 Cannon select/deselect ("A"). Rotate between cannon and selected hardpoint.
- JOY BTN2 Weapons release ("Fire" - red with safety cap) for other than cannon.
- JOY BTN1 Fire cannon if selected by JOY BTN3. This is the index finger trigger.
- JOY BTN4 SKVAL cage/uncage ("B") (Target designator)
- JOY BTN6 Center View ("pinky"). Instant return to normal forward view.
- JOY BTN POV View up/down etc.,( main hat, right side)
- JOY BTN20-23 Targeting box slewing (secondary hat, right side)
- JOY BTN9 and 10 Gear toggle (Up) and wheel-brakes (Down) ("T1/T2")
- JOY BTN11 and 12 Targeting box re-size ("T3/T4")
- JOY BTN13 and 14 TV zoom (T5/T6)
- On the stick itself (the usual) Pitch, roll, rudder (twist)
Left side control unit -
- Big hand-grip control Collective. The slope of the curve has been reversed so that pulling back increases the collective, as on the real helicopter.
- JOY BTN8 Toggle helmet mounted targeter ("E")
- JOY BTN7 Target lock ("D") - the button that falls naturally under your thumb.
- JOY BTN24-27 Wingman Commands: Attack Air Defenses (click up), Cover Me (click right), Engage Ground Targets (click down), Complete Mission and Rejoin (click left).
For everything else I use the mouse to click actual cockpit controls.
Targeting Summary (with reference to Saitek X52 Pro)
- With helmet mounted site engaged and LASER on (Master Arm ON assumed) ...
- Click JOY BTN4 (as often as necessary) to cause the target designator to float to your center-of-HUD bull's eye marker (which should be aimed in vicinity of target). The designator will now stick there as you move and auto-turn, if engaged, will try to aim the Ka50 that way. Try to get the designator closer to the target (if necessary) by maneuvering so as to place bull's eye close to the target and clicking JOY BTN4 again.
- While holding down (optional ... but you may need to do this when attempting to lock a subsequent target) JOY BTN7 (Lock), slew the targeting gate precisely over the target and release JOY BTN7. The gate should now stick there and the letters "TA" appear in the SKVAL if the target is within range/heading constraints. The target is now locked. If you see "TT" in the SKVAL the target is not locked. Try again. You can fire at an unlocked target and the guided weapon will still fly to the LASER but the latter will move ... possibly off target. You can try holding the LASER in place manually but this is tough. The letter "C" appears in the HUD and on the SKVAL when the target is within the weapon's deployment constraints ... in range but not too close, etc. ... and the weapon's targeting symbol will overlaps or encloses the designator circle.
- Note that desgnating a target is not the same as locking it. Designating means the LASER is in position and the guided weapon will go there but, not being LOCK'ed, the LASER may move off-target with motion of the helicopter, causing the weapon to miss. See Combat Notes farther down the page for what to do if you cannot lock a target.
- If the Vikhr guided weapon is selected you will see a circular weapon constraint symbol with a couple of min/max range ticks on the circumference floating on the HUD. Maneuver the helicopter so this circle encloses the smaller, circular target designator locked on the target in the steps above. If within range constraints, "C" will appear in HUD and on the SKVAL. You are clear to fire so long as you have "C". Try to ensure the Ka50 remains faced more or less toward the target until impact. The LASER is gimbal mounted and, within reason, will attempt to stay on the target as designated/locked, guiding the Vikhr throughout its flight. Occasionally you will miss. Apparently, this a simulation of the fact these weapons are not infallible, that wind interfered or whatever.
- The cannon is similarly guided if that's what you want. That is, at the time of firing, the targeting system aims the cannon taking into account target range and helicopter motion to guarantee (usually) a hit. Once the rounds leave the cannon they are no longer guided, of course, so if the target moves more than expected, you are likely to miss. The HUD symbology will display a rectangular box within which the cannon is automatically stabilized toward the locked target. You can disengage the cannon from the guidance system by disengaging the helmet sight and RESETing. A big "X" with any weapon means range and/or aiming constraints have been exceeded.
- Rockets cannot be guided. When chosen they simply fire along bore-site toward their circular impact point designator. It's tough hitting small targets with rockets. Being unguided in any way their flight path is subject to inputs from not only gravity but the helicopter's motion along all axes. Rockets are best against massed targets like aircraft sitting beside a runway, large targets such as fuel tanks and buildings or convoys where you do not need great precision to do a lot of damage. With much practice you can learn to predict the flight path of rockets and anticipate when to fire even during strenuous maneuvering. This is more art than science but with practice it is amazing how accurate you will become. While still acquiring the knack you will have most success by stabilizing the helicopter toward the target before firing. This takes time, however, and may expose you to enemy fire.
- Reminder: Turn off auto-turn to prevent flight control interference when flying between targets because the helicopter will otherwise want to turn back toward the last designated target. Or, reset the weapons system. You may find auto-turn not that useful under any circumstances, especially as your flying skills improve.
- Resetting the weapons sytems is useful after deploying Vikhrs and wanting to use rockets next. After reset, you must manually choose the rocket hard-point (or Vikhr if that is your choice again). IMPORTANT: Reset also disengages Ground Moving Target and Auto-turn feature so you may need to enable these manually or use the RESET cancel (KB = G12 with my profile) before using guided weapons again. If you don't, you will probably miss moving targets.
Flight Configuration and Checklist (using my profiles)
- To take-off pull back on the collective while slightly pushing forward the cyclic. That forward push prevents an embarrassing backwards take-off. There are, however, times whn taking off backwards may be the best way - such as off the back of a ship.
- As soon as aloft, click "M2" on the G510, then "G1". Gear will retract and a whole lot of other useful things will happen like cockpit lights and ABRIS power-up. Wait for the sequence to finish which is when your decoy dispenser unit is configured.
- Click "M1" then "G1". This prepares the Ka50 for combat. Master Arm comes on, the LASER turns on and, finally, the helmet mounted targeter deploys (along with outside hardpoints carrying the Vikhrs). You will probably want to stow the latter for now by pressing "G10" (this is a toggle) or the "E" button on the X52.
- Use G7/8 to select inboard/outboard wing-mounted weapons. From the mission briefing you should have some idea which of these you will need to use first.
- By now you should be heading toward your first waypoint. Check the ABRIS and adjust zoom level to suit your needs.
- Trim a few times while adjusting speed and altitude to your needs.
- You might want to modify your decoy options (upper right of cockpit) using the mouse depending on expectations.
- Click JOY BTN3 to activate the cannon. This is a carousel type control ... the next click will choose whichever of your wing-mounted weapons has been selected by G7/8 and the next click chooses the cannon again. It is always good to have a weapon ready to use at a moment's notice.
- When landing be sure to deploy landing gear with JOY BTN9. You may need the wheel brake on JOY BTN10. If you are really good you can touch down without deploying landing gear or incurring damage. This is just showing off and thoroughly un-professional. Worst of all, an observer might understandably suspect you forgot about landing gear altogether. That sort of amateurish blunder is difficult to live down.
Too easy. With the macro keys numerous cockpit control inputs have been managed by your computerized "co-pilot".
- During combat you may find targeting does not work or you cannot fire a guided weapon. For example, there is no targeting gate. ... Ensure the LASER has not been disengaged. Also note the helmet mounted targeter must be deployed. You will not get a "fire" cue ("C") if the target is too far or too close for the guided weapon, including cannon ..... OR .....
- If a wing mounted weapon such as the Vikhr will not release, make sure the cannon is not deployed. It gets priority.
- You cannot lock a target despite putting the gate on it and attempting lock. ... Ensure the gate is not too big. Ideally it should fit within the target itself or just enclose it. A minimum size gate always works but may be difficult to see in some conditions. The targeting system needs some detail to work with. You cannot lock on a blank wall, for example. Include something with contrast, such as a door-frame.
- Finally, you may not get a lock or a weapon of any type may not release if the weapons systems have been damaged by enemy fire. Time to head for home.
- The cannon is a surprisingly effective weapon. It has a rapid rate of sustained fire and the rounds spatter a good deal around the intended impact point, providing something of a shotgun effect ... useful even against small targets such as MANPADS. At short range, especially, the rounds travel faster than rockets, making the cannon more accurate with moving targets and less susceptible to motion of the helicopter. Accuracy when used with the helemt mounted targeter is excellent.
- In vicinity of hostiles, keep low. This is the helicopter's great strength. You can avoid attacks by using buildings and terrain as cover. Pop up to fire your own weapons, then duck down before the enemy can get a shot away. Out in the open you are extremely vulnerable.
- When engaging armed infantry keep moving. The damage sustained from their rifle-fire will accumulate and bring you down sooner than you might think. Make repeated passes or employ a funnel maneuver. This will compromise their aim. Alternatively, stay out of their range altogether and use the targeting system with cannon to pick them off while you hover. Won't work if they have Stingers ;~
- SAM's are your greatest hazard. Stay behind cover and pop-up only briefly when it's necessary to risk exposure to these weapons. Ensure counter-measures are ready for deployment. You can sometimes get MANPADS to use up their three rounds without hitting you by making very low, fast passes over them while deploying decoys and turning quickly to make the next pass. Your aspect with respect to the missile changes so rapidly it may not be able to track at all and the decoys are simply insurance. With practice, very effective. It always takes the guy a few seconds to prepare his launcher and as you approach you might be able to pick him off with the cannon or rockets.